Sunday, September 23, 2012

This Girl Loves Health & Beauty Products

Health and beauty products are a weakness of mine. I love to try different products. And, there's something exciting about getting a new lipstick or gloss. While in college, I was a salesclerk in HBA at a Walmart store. I loooooooooooooved it! I loved helping people with product. I have my go-to brands.

I struggle trying to figure out how I want it all organized. All of my stuff drives my husband batty. My dream house would have his and her vanities in different rooms - we would share the tub, shower, and bathtub. We currently have a double vanity in our master bath.

Over the last few days, I think I've found a solution to organize my bathroom drawer and under my sink. Sadly, my make-up is another story - it's in a rolling cart, not the drawer or under the sink.

The Daily Use Drawer
It seems to be a catchall. The drawer is deep. I like it because things like my contact cleanser and face toner work in it. I really like those Olay containers to hold things. Overall, I wasn't optimizing (that's one of the buzzwords of the moment at work) the vertical space. You might notice that I have a fondness for Estee Lauder and Mary Kay. I'm not sure why I kept an empty box for my inhaler. Check out the before and after photos below.

Bathroom drawer before.
Now for the after photos. I used the small Sterilite containters from Walmart. One container has all of my ponytail holders and barrettes. Another one has my extra contacts in it. A third one has headband elastics and clips. The fourth one has some alcohol wipes. I used a small but tall container to corral all the odd shaped and small bottles. 

The Olay containers went to the garage for my husband to use or throw out. I also pulled all of the travel size products out of my daily use drawer.

Bathroom drawer after.
Under My Sink
I should be embarrassed by the amount of hair products that I have under my sink, but I'm not embarrassed. I think I'm going to add some Command Hooks to the inside of the cabinet. Check out the before and after pictures.

Before: Yes, all of this product belongs to me. Talk about clutter!

Before: The before with the front few rows of stuff out. I realize
my choice of storage containers are not very functional.
After: The basket came from some at home party.
The white bins are Rubbermaid from Walmart. The clear
container is Sterilite from Walmart.
After: At the back is my stash of extra shampoo. The basket
has all my sprays and foams. I did try sorting it. I used the Sterilite
container for cotton balls - for some reason I have three bags.
After: Finished! I used the trays for the shorter items. I use a
old bag from Philosophy to hold my velcro rollers. I think a
Command Hook or two on the walls might be useful for something.

Tuesday, August 28, 2012

WW Project - Month 4

Month four of the WW Project was a big month for me - I'm excited to share that as of Aug. 23, I've lost 26 pounds. I'm back in the clothing I was wearing before leaving the corporate beast in 2009. I'm feeling good, I feel like I have a new wardrobe.

I should have hit the 30 to 40 pound might by this point, but I admit I had a few opportunities.

Opportunities ... one of the most overused words used by corporate professionals. In the fourth month, I found myself getting bored with the food I was eating. I don't crave things like I used to, but I was just getting to be too much of a creature of habit.

I didn't embrace vegetables like I had planned on doing, but I am drinking a lot of water. At book club, I decided I needed to start looking at eating veggies as a need not a want. I ate asparagus. It wasn't bad, but I will be shocked if you ever hear me say something like, "asparagus would really hit the spot."

My traditional lunch - ham and cheese sandwich with Baked Lays - has had a mini makeover. I changed it to just the ham, a Laughing Cow cheese wedge, a pickle and Baked Lay or Triscut Thins. It's less points and I like it just as well.

My emotional eating habits have changed a bit - I'm more alert to the urge to emotionally eat. I've started to somewhat reward myself by making it through the emotional eating days. I find that when I emotionally eat it tends to be a day long thing - anything within reach is fair game. Once I realized this, I decided instead of giving in to that and just eat something that really didn't satisfy me that would treat myself at the end of the day. My treat is an ice cream cone from Dairy Queen. I love a cones of chocolate ice cream. Oddly enough, I'm often 'over it' by the end of the day and don't follow through with the treat.

Until next month ...


Monday, August 27, 2012

Chocolate Chips Make Everything Better

My Pinterest addiction helped me discover a recipe for Brownie Batter Chocolate Fudge Cupcakes by Kevin & Amanda. I made them for the card night; they were delicious!

The next time I make them I will half the frosting recipe and use three trays for the cupcakes (making 36). The ones that turned out the best (by looks only) were the ones that had closer to 2 Tablespoons of cake mix and a drop of brownie batter. They are also great without frosting.

I had so much frosting left over from making the Brownie Batter Cupcakes that I decided to try a little something.. With a few tweaks of the original cake recipe, I made French Vanilla & Chocolate Chip Cupcakes with chocolate frosting (scroll down to the frosting recipe). I used a Wilton's 2A Boquilla tip - bought them at Walmart in a set.

As a kid, my favorite birthday cake was chocolate chip with chocolate chip frosting.
Making these cupcakes brought bake a lot of great birthday memories!

French Vanilla & Chocolate Chip Cupcakes
Preheat oven to 325 degrees. 

Line cupcake pans with 24 to 30 liners. I used the Reynolds Baked for You - Stay Bright Liners. I found them at Walmart in the aisle with the Ziploc bags.

  • 1 French Vanilla cake mix (I used Betty Crocker)
  • 1 box French Vanilla pudding (3.4 to 3.9 oz box)
  • 1 cup sour cream (I use regular)
  • 1 cup vegetable oil
  • 4 large eggs
  • 1/2 cup milk (2% or whole)
  • 1 1/2 to 2 cups of semi-sweet mini chocolate chips (I used Nestle)

Mix the cake mix and pudding mix (just the dry - you don't actually follow the recipe on the boxes) - set aside about 1/4 of the mix in a separate bowl with the chocolate chips. 

Pour a big glass of milk and enjoy! These are moist and the
frosting is rich.
Mix the remainder of the cake mix, pudding, sour cream, vegetable oil, eggs, milk and vanilla bean paste for about 3 minutes on 'stir'. I use a Kitchen Aid stand mixture, but you can easily use a hand mixer on low speed.

Stir the bowl of mix and chocolate chips to 'coat / dust' the chips with the mix. This helps keep them from sinking in the batter. Then fold in to the cupcake batter. 

Spoon or scoop the batter in to the cupcake liners. Fill 1/2 to 3/4 full. Be careful not to overfill.

Bake for 25 to 30 minutes. Let cool and top with frosting.


Sunday, August 26, 2012

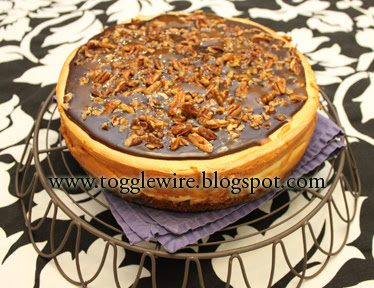
Yummy Goodness - White Chocolate Cheesecake

Several years ago, I purchased the cookbook Favorite Brand Name Best-Loved Chocolate Recipes. This book is where my signature cheesecake recipe came from - it's a White Chocolate Cheesecake. Over the years, I've discovered a few tips for making it.

This is my go-to base for a basic cheesecake. I add different toppings, but the base is usually white chocolate. I think you could easily substitute semi-sweet chocolate and create a marble cheesecake.

Cheesecake is easy to make, it just takes a lot of time. I think a lot of people don't like to make it because it's not something you eat right out of the oven. Also, the ingredients for cheesecake cost $15 and up.

Here's the recipe for the base and how to jazz it up and make it a turtle cheesecake.

The crust is kinda like a sugar cookie. I think you could do about any kind of cookie for the bottom. Depending on the size of your springform pan, you might want to double this. I use a springform pan from Pampered Chef - I've used several over the years and this is my favorite.

You can top with your favorite topping - sometimes I just use chocolate shavings.


Heat your oven to 325 degrees.

The Crust
  • 1/2 cup (1 stick) softened butter - salted or unsalted is fine
  • 1/4 cup sugar
  • 1/2 to 1 teaspoon vanilla (to your taste)
  • 1 cup flour
  • 1/2 teaspoon vanilla bean paste (optional)

Cream together all the ingredients - a hand mixer works great to get it fluffy. Spray the bottom and sides of your springform pan with a non-stick spray. Press the dough onto the bottom of the springform pan; prick with a fork.

Bake 25 minutes or until light golden brown. Let cool in pan.

The Base / Filling
  • 4 blocks (8 oz size) of softened cream cheese (I use Philadelphia brand)
  • 1/2 cup sugar
  • 1 to 2 teaspoons vanilla (to your taste)
  • 1 teaspoon vanilla bean paste (optional)
  • 4 large eggs
  • 12 oz white chocolate (I use Bakers), melted and slightly cooled

I use a Kitchen Aid stand mixer, but you can also use a hand mixer. Beat the cream cheese, sugar and vanilla  until well blended (about 2 minutes on 'stir'). Add the eggs - one at a time - until blended. Do not over mix.

Fold in the melted / cooled chocolate. They say if the chocolate is too hot it can start cooking the eggs. I have no clue if this is a myth.

Poor the mixture over the slightly cooled crust. Bake for 55 to 60 minutes. The center will be almost set and the edges will start to pull away. 

Place on a cooling rake - run a knife around the edges. Let cool for about 15 minutes. Then slowly release the form of the pan. Refrigerate for 4 hours or overnight. 

Good to Know
Cheesecake splits when it pulls away to quickly from the sides of the pan. I've made a lot of cheesecake and can only remember one not cracking. No need to fret because the topping covers it all up.

I find that cheesecake cuts better after setting out for about 10 minutes.

This cheesecake it rich and heavy. I've never substituted reduced or fat free cream cheese or a sugar substitute, so I'm not sure how it would turn out using substitutes.

Make it a Turtle
I use this ganache recipe from Taste of Home.

1/2 cup milk chocolate chips (I use Hershey's)
1/4 Heavy Whipping Cream

Bring the heavy cream just to a boil; pour over the chips and stir until smooth. Let the chocolate cool slightly and poor over the cheesecake - you can spread or drizzle it.

Sprinkle chopped pecans (to taste) on top of the ganache then drizzle caramel sauce (I use Hershey's or Smuckers) on top.


Monday, July 23, 2012

WW Project - Month 3

The third month of the WW Project is over. Although I haven't lost quite as much as I had wanted by this point, I'm proud to share that I've lost 23 pounds. I'm averaging 1.6 pounds a week. 

My weight loss has been because of counting points. I finally have a good understanding of portions and points. And, I've realized not to assume those 100 calorie packs are a good choice. Also, I doubt I'll be buying Laughing Cow product very often. I've found that although they are a good option for sweets, it's better for me not to have sweets in the house. Hunts Snack Pack pudding is something I love - it's 3 points - I've loved it since I was a kid ... when it came in little metal cans with pull-top lids.

Let's Get Tracking

Most of the Weight Watcher success stories I read or hear all give props to tracking their food and activity. The online tools offered through Weight Watcher are just what this closet spreadsheet nerd needs. One of the tools that I should use more often is the View Your Progress tool. 

Below is a screenshot for four weeks. Notice the weeks that I lost the most significant amounts were the weeks that I tracked my food. The week I had the most activity points, I didn't track my food and I didn't lose any weight.

For me, tracking is definitely the difference between a good week and a not so good week. 


Month 3 Highlights

20 oz. Aladdin tumbler - insulated so
it doesn't sweat
  • Thanks to my Aladdin tumbler, drinking water has become routine. I bought mine at Target, but you can also buy it online via Amazon.I'm a huge fan of Tervis tumblers, but I don't like the straws that come with them. 
  • The majority of my pants are fitting better. Most of the weight has come off my midsection.
  • I found several pairs of pants in my closet with tags on them. They are a size smaller than what I'm currently wearing, so they are my incentive to keep focused.
  • Lost 1/2 pound following a week in LA for work. Work trips are always a challenge for me. Before the trip, I let my co-workers know my intention to try to make smart choices. I managed to only eat three snack size Milky Ways from the office manager's candy jar. That's a big deal for me. Speaking of travel ... I didn't feel quite like I was squished in the seat. I still have a ways to go for airline travel to be comfortable.

For month four, my goal is to add activity to routine. I also want to get over my lifelong dislike of most vegetables. So, I'm going to start giving some of them a try. Embracing vegetables is going to be a big challenge for me.


Check back in 30 days to read about month four of the WW Project.

Saturday, June 30, 2012

Food Therapy; Food Personality

About five years ago, I took diet pills (with doctor supervision) for weight loss - I refer to it as food therapy. My doctor had me to keep a food journal that included:
  1. What I ate
  2. What time I ate
  3. Level of hungriness
  4. Emotion at the time I ate
The food journal was the first time for me to identify that all emotions trigger me to eat. Boredom, happiness, sadness etc. all trigger me to want food. 

Today with Kathie Lee & Hoda is typically on while I'm working. They recently ran a segment called What's Your Eating Personality (totally worth clicking on the link and watching for 2 minutes) with Madelyn Fernstorm. The segment hit home with me in a big way. It made me think a lot about food therapy and the WW Project.

My food personality is:
  • 3 meals a day This is without a doubt me. I find that I eat because I think it's time to .. not because I'm hungry. Even though I consider myself and emotional eater, I tend to do it more at meals.
  • Carb Craver This label might be one that is more because of convenience. I love eggs, but it's quicker for me to grab a granola bar.
  • Volume Eater This was an easy one for me because the night before the segment aired I made myself a root beer float. Volume is without a doubt a thing for me. I would rather have more of something with less calories than a little of something super delicious. If points weren't an issue I would always buy Blue Bell ice cream. It is the best ice cream! Now, I buy low fat frozen yogurt from the Schwann's guy. I can eat more of it, and it doesn't taste bad. 
  • Part sweet tooth; part fat tooth I think because I love ice cream so much, I'm a fat tooth. I also love Milky Way candy bars (haven't had one in more than 2 months). 

I feel that if I take what I take the knowledge I have from food therapy, food personality and Weight Watchers that I will be more successful with the WW Project.

Sunday, June 24, 2012

WW Project - Month 2

That's me; the pear on the right. I really didn't want to include pictures throughout the project, but then I decided pictures would make the process more real. For some reason, I don't want to share my starting weight. I figure I give enough clues that you can guess a range. I will share my height; I'm 5' 6 1/2".

The picture to the right was taken on June 13, 2012. The jeans are too tight for my liking - they are size 24 from Coldwater Creek. The shirt is a 2 XL (20-22) from Coldwater Creek. At this time the bottom button will barely button.

Month two of the WW Project was really about staying focused and inspired.

Achieved: Goal 1 - Lose 5% of Start Weight
So, I met my first goal - which was to lose 5% of my start weight. That 5% is equal to 15+ pounds. My reward for the 5% loss was to redeem a facial that I purchased in December. Well, the place went out of business! That's right, I'm out the money and no reward of a facial. So the reward is the satisfaction of knowing I accomplished the first goal.

Staying Focused and Inspired
Looking at losing weight as a work project has really helped me. This is not an easy project, but I really can't think of many work projects that are easy.
  • Foods I love: Knowing that I can eat (in moderation) the things I really enjoy has made it easier to stay focus and inspired. Food scales and measuring spoons / cups are my new best friends. The mini-scoop is the best tool. I can still have chips and salsa! I love having it for a treat (sometimes it's my meal) 1 oz of Baked Tostitdos (3 pts), 2 T of On the Boarder Salsa (0 pts) and 2 T of Kraft 1/3 Fat Philadelphia Cream Cheese (2 pts). You know what, that's a lot of chips and salsa!
  • Milestones / goals: All projects have milestones / goals, my next goal is 25 pounds of total weight loss. Another way that I'm looking at it is 10 pounds because I've lost 15. Those 10 pounds should make all my pants fit comfortably. 
  • Shopping options: I have a few friends that I've told that I'm looking forward to going clothes shopping with them. By this time next year, I should be able to shop the same stores they shop. It'll be interesting to see if my personal style changes once my options open expand.
  • Working from home: I feel fortunate that I have a job in which I work from home (90% of the time). I travel to California three to four times a year for a week at a time. In the morning, the TV in my office is usually on the Today show. The Joy Fit Club is one of the segments that motivated me to get on a weight loss program. The stories are real and I related to so many of the stories.
  • A salad a day: Since veggies and fruit are great filler and little to zero points, I try to have a salad a day. It really helps with the total points.
  • Accountability partner: my dear friend, CJ, is my official accountability partner. I check in with her weekly. I have other family and friends that I check in with on occasion. 


Activity Points Are Everywhere
Who would have thought cleaning (light cleaning) the garage equals activity points? We bought our home in 2010, sadly we have a mess in part of our garage. Much to my surprise - 45 minutes of cleaning in the garage is 4 activity points. It has been a lot of work, and I still have a lot of work. Not only am I getting rid of shit, I'm getting activity points! Yay for cleaning the garage.

My husband and I hoed, hedged and weeded the entrances to our subdivision. We spent about four hours (consumed a lot of water) cleaning it up. I looked at it as multi-tasking: cleaning up the entrances, working on my tan, and earning activity points.

Libby's Great Idea
My friend, Libby, shared her exercise and weight loss reward system with me. She counts calories and exercises regularly. She rewards herself with things like music or book downloads or a movie for working out on the weekends. Libby is very dedicated to working out through the week but has a hard time getting motivated to work out on the weekends. She has various levels of rewards for different things related to exercise and weight loss. I love the idea and I started something similar.

Check back in 30 days to read about month three of the WW Project.

Monday, May 21, 2012

The WW Project

Like a lot of people, I've gained and lost weight several times in my life. For years, I've said that I want to be in the best shape of my life at age 40. I will be 40 this December.

Through Pinterest, I've discovered so many wonderful blogs by women that have succeeded at weight loss. Admittedly, I read some of them while eating Girl Scout cookies. Reading their stories made me start looking at my own life and what has got me here.

I don't have a sad story as to why I'm overweight. My short story is that for years, I've put everything else ahead of my health. Some of my family and friends would tell you that I'm a workaholic. Some would tell you I'm lazy and others may tell you that I'm my own worst enemy because I love to bake. Then there are the ones that would tell you that I lack willpower when it comes to things for me.

All the success stories and my own self reflection inspired to begin what I'm referring to as The WW Project. The project kicked off about 30 days ago and will wrap up around December 2013. Only a few people know about the project. The following for my blog is minimal, so I feel okay sharing the details of the project.

The WW Project is how I've chosen to look at my journey to a healthier me. The realization for me was that I need to look at achieving my weight loss goal as a project. I can manage a work project great, so I decided to apply my project management skills to becoming a healthier me.

Weight Watchers online is the program that I opted to use to get me to my goal. You guessed it the WW represents Weight Watchers. The online tools are great - the app for the iPhone is also great. There was still something missing for me, so I created an Excel spreadsheet. The spreadsheet has formulas, so it is easy to identify milestones and how long it will take me to get to my goal weight. It's a quick visual that makes sense to me because it's set up much like a work project plan.

I'm thrilled to share that I've lost 11.5 pounds since I signed up (April 22) for WW.

Key Takeaways for the First 30 Days

  • A small scoop is a must have for things like peanut butter, cream cheese, sour cream, mayo etc. Get one that is 1 Tablespoon. It makes it so easy for portions.
  • I can make a delicious PB&J sandwich for around 11 points.
  • Adjusting to low sugar and natural sugar items is an acquired taste. These low sugar baked oatmeal cups from Sugar-Free Mom are okay with a little honey on them. You have to know going in they are low sugar and the texture is a little different. The win is that they are only 3 points (4 points with the honey) and they are extremely filling.
  • The reduced fat Philadelphia cream cheese is the tub is 2 points for 2 Tablespoons. A wedge of Laughing Cow Lite Swiss is 1 point - a wedge is about 1 Tablespoon.
  • Thin Mints are 1 point each - Who can eat one cookie? One sleeve, yes ... one cookie, no.


Tuesday, May 15, 2012

Calling All Angels, Remembering Cole

Mother's Day 2008 - Cole, Drew and Clay.
Four years ago, my oldest nephew, Cole, passed away unexpectedly. I think about him more days than not, but this time of year he is in my thoughts more. He passed away on May 22, 2008. Our family has been blessed with wonderful friends that have been there for us in one way or another.

The song Calling All Angels by Train is my official Cole song. Anytime I hear or see Eminem, I think of him. He had discovered Eminem around the time of his death.

I often wonder what Cole's interests would be today. What music would he like - still Eminem? Through Facebook, I've watched his friends grow up. They are learning to drive, going to school dances, experience teenage love and having summer jobs. Here's an earlier entry about Cole,

Cole around the age of four.
I think he would have continued to be a great older brother to Clay. They would hunt and fish together. Maybe even chase girls. He would still make his parents proud. He would be a great cousin to Drew. He would have welcomed Corey and Joel into the family.

The picture to the right is one of my favorite pictures of Cole. One afternoon, he was at my parents house. I was messing around with my dad's old 35 mm Nikon, and Cole was my model. Most of my memories of Cole are around this age, I think it's because I was still living in Illinois at the time.

The loss of Cole so unexpectedly and at such a young age opened my eyes to a lot of things. My perspective on things definitely changed after his death. Somewhere I read, "Don't compare your life to others. You have no idea what their journey is all about." So true! You also never totally know what is causing someone to feel the way they do.

Here's a link to an article that appeared in Buckmaster magazine about my brother Daryl - Cole's dad. It's a wonderful story about what an amazing hunter Daryl is and his real trophy. Click here to read - be sure to grab a tissue.

Update 5/21: My sister took the following picture. It's a memorial to Cole - it's located on my brother and sister-in-law's property. They created it with a lot of the plants and statues sent to the funeral. It overlooks their pond.


Sunday, May 13, 2012

Chocolate Chip & Heath Cookies

Fancy grocery store inspired chocolate chip and toffee cookies.
My mom taught me how to bake, but the best chocolate chip cookie recipe ever came from my friend Richalle. Richalle's mom makes amazing cookies - the secret ingredient is instant pudding.

About the same time she shared the recipe with me, there was a fancy local grocery store that sold chocolate chip and toffee cookies. So, my recipe was inspired by the fancy local grocery store.

Pudding and chocolate chunks
the key to awesome cookies.
Ingredients

  • Nestle Chocolate Chip Chunks
  • Heath Toffee Chips (I use half a bag)
  • 2 eggs
  • 1 cup butter softened (not melted)
  • 1 teaspoon vanilla
  • 3/4 brown sugar
  • 1/4 sugar
  • 2 1/4 cup flour
  • 1 teaspoon baking soda
  • 1 package french vanilla pudding (dry)

In a bowl: mix flour, baking soda and pudding - set aside.

Mix the butter with a mixer for about a minute - I use a KitchenAid stand mixer. Then mix in the sugars. After the sugars and butter are mixed well, add the vanilla and the eggs. Gradually mix in the flour mixture. Add in the chips. Spoon/drop the cookie dough on the cookie sheet.

Bake at 375 degrees for 8 to 10 minutes. Let the cookies cool on the cookie sheet while baking a second sheet ... cool the cookies for about 8 to 10 minutes. My preference is to make one tray at a time using a Pampered Chef stone, but I rarely have time to make them that way.

I use the 'base' of this recipe to make white chocolate and macadamia nut cookies in addition to other combinations. The pudding seems to help the cookies stay moist for several days.

I get about 50 two inch cookies out of this. According to the Weight Watchers recipe builder, they are 4 points each. You could reduce the points by using less chips and substituting for healthier flour and sugar alternative.

Sunday, March 25, 2012

Making Sandra Lee Proud

The ingredients.
For a long time one of my favorite tv chefs has been Sandra Lee from the Food Network's Semi-Homemade. If you're not familiar with her, she shows you how to make great food that's not made from scratch ... it's semi-homemade.

When I came across the recipe for S'mores Cookies on The Girl Who Ate Everything, I knew I wanted to try making them. Christy's recipe is great, but I wanted to make it even more spectacular by making it faster and easier.

All those hours watching Sandra Lee paid off because I immediately thought about using Nestle break and bake cookie dough.

Getting together with the girls for cards, was the perfect opportunity to try out this recipe. I tried making the s'mores cookies two different ways.

S'mores Cookies - Version 1

For my first attempt, I spaced the graham crackers out on the cookie sheet. I also used a full square of the cookie dough. I baked them at 325 for approximately 15 minutes. I put the Hershey's on after the cookies came out of the oven. The end result was more of a cookie look.

Version 1 - looking good.

Version 1 after about 15 minutes at 325.

S'mores Cookies - Version 2

For the second round, I placed the graham crackers next to one another. I also used half of a cookie dough square for each graham cracker. This time I also, cut the marshmallows in half. They seemed to stay in place better and not roll around. After they baked, I cut as needed. For the most part, the cookie dough fit the cracker.

Version 2 - looking good

Version 2 - after about 15 minutes at 325

My preference is Version 2. Next time, I'll use more marshmallows. I might also try them with chocolate graham crackers and peanut butter cookie dough.

The great thing about making these was that the clean up was super easy. I dirtied a knife and spatula. They were a huge hit at cards.

Macarons Take Two

My current 'strange addiction' could be mastering French Macarons. I blame my fascination with French Macarons on my friend Tammy and Pinterest. Tammy has mastered making them; however, she is a full-time pastry chef. Through Pinterest, I found David Lebovitz and Helene Dujardin they are simply amazing. They share their knowledge through their sites.

Second attempt at French Macarons - I give myself a B+
I tried making macarons earlier this month and needless to say the shells were a failure. Back to the internet I went ... in search of tips for making French Macarons. I came across "How to make macarons: what's working for me right now" on the blog Eat. Live. Travel. Write. This post is full of great tips and tricks. It was here that I found the best tip about piping the shells - pipe from the side. This combined with taps / whacks of the tray on the counter help create the little foot and a smooth shell.

Today was attempt number two at making David Lebovitz' Chocolate French Macarons, and I'm thrilled with how they turned out. I also made his chocolate filling - mine didn't seem to be as thick as I thought it should be. I took them with me to share with the card girls. They all agreed they were tasty.

What's working for me:

  • Weighing the ingredients with a food scale.
  • Grinding the almond flour, confectioners sugar and dutch coco in a food processor then shifting it.
  • Piping the shell filing from the side.
  • Leaving the egg whites out for about 30 minutes to an hour. Long enough to get about room temperature.
  • Whacking the cooking sheet on the counter - it seems to help the shells get the foot and a smooth top.
  • Baking them right away. That's right, I don't let them set out for an extended period of time.

I'm now ready to try a new flavor. What should I try next?


Saturday, March 3, 2012

Macarons Sans Coconut

It wasn't until I met the amazing pastry chef and artist, Tammy Varney, that I learned not all macarons have coconut. Tammy makes amazing French Macarons for her cafe - Meridienne Dessert Salon & Cafe in downtown Rogers. She also designed and made our amazing wedding cake.

'American' Macaroons have coconut and a second 'o'; however, French macarons do not have coconut and only have one 'o.'

Through Pinterest, I found David Lebovitz. He's another amazing pastry chef / baker. On his site he gives a lot of how to about making French Macarons, and he has a recipe for French Chocolate Macarons. I ordered the ingredients from King Arthur Flour that I couldn't find at the local Walmart.
My first try! Pre filling.

I followed his recipe and even weighed the ingredients instead of going by volume. They tasted amazing; however, I need to work on my piping technique. Also, I think I added the sugar to the egg whites too soon.

They had the 'footing' on the bottom, but only three came out with a smooth top. I'll try them again and again until I master the shape - which I think is all about the way it's piped.

Personal note: I do not like coconut.


Saturday, February 25, 2012

Tahmra's Sugar Popcorn

Today, I spent the majority of the day cleaning / organizing my work room with lots of breaks to check Facebook and Pinterest. A Facebook post from my friend Tahmra caught my eye - it was simply a picture of popcorn that she called sugar popcorn. She totally teased several of us because she posted it and then watched a movie. I thought maybe it was as simple as sprinkling sugar instead of salt. After the movie, she kindly shared the recipe.  Oh, it's so much more delicious than sprinkling sugar.

Every once in awhile a tasty treat gives me a flashback to childhood. Needless to say Tahmra's Sugar Popcorn did just that. The first bite took me back to the summer before fifth grade when we got our first microwave. The microwave was a great invention; however, I quickly learned to make Rice Krispie Treats in the microwave. That summer I gained 20 pounds. Making a bowl of Rice Krispie Treats was way to easy - heck, I mixed everything in a bowl and ate from the bowl. Enough of my trip down chubby lane.

Here's Tahmra's Sugar Popcorn Recipe

Ingredients:
  • 1/4 cup butter
  • 1/4 white sugar (use brown sugar if you want a caramel flavor)
  • 2 Tablespoons corn syrup
  • 1 bag of plain microwave popcorn (I recommend Orville Redenbacher's Natural)

Before I devoured more than half the bowl.
Pop the popcorn - dump in bowl. Melt (medium heat) the butter, sugar and corn syrup in a small saucepan. Once the sugar is dissolved, the mixture will be nice and smooth. Dump the mixture over the popcorn - stir or toss to coat the popcorn. 

Grab a handful of napkins and your favorite beverage - enjoy!

I'm curious to make this with Splenda and I Can't Believe It's Not Butter. I think it might also be good with sea salt or Kosher salt (something large ground) maybe even with some salted peanuts. 

Saturday, February 11, 2012

Go Go Bananas and Sour Cream

Several years ago, a co-worker brought the most delicious banana bread to work. It was super moist and fabulous. She said the secret ingredient was sour cream. At the time, I wasn't aware of all the things sour cream is added to, so I was a bit shocked when she said that the banana bread contained it.

The only banana bread recipe I had ever made was from Pampered Chef. The recipe had peanut butter, peanuts and chocolate chips. A few weeks ago, we had some bananas that needed thrown out or used in a recipe. I didn't have everything to make my go-to banana bread recipe, so I searched www.allrecipes.com for a banana bread recipe with sour cream. All Recipes is my favorite site for searching recipes.

I decided to go with Cathy's Banana Bread recipe. It had great reviews and called for sour cream. I can't seem to follow a recipe exactly, so below is my version of the recipe.

Cathy's Banana Bread - Vanessa's Way
Too bad the internet doesn't have smell.
  • 1 cup or 2 medium / large bananas mashed
  • 1 cup sour cream
  • 1/4 cup butter (softened)
  • 1 cup brown sugar
  • 1/3 cup white sugar
  • 2 eggs
  • 1 tsp vanilla
  • 2 cups flour
  • 1 tsp baking soda
  • 1 tsp baking powder
  • 1/4 tsp Kosher salt
  • 1/2 bag chocolate chips (optional)
Mix the bananas and sour cream together - it'll kinda be the consistency of pudding. I use a Pastry Blender or the Mix & Chop from Pampered Chef to mash the bananas.

Mix the butter and sugars. Add the eggs and vanilla. Then blend in the banana mixture. Next add the dry ingredients. The batter will be kinda runny.

Divide the batter in four mini loaf pans. I use an ice cream scoop to divide the batter - about four scoops per pan. Bake at 350 degrees for 30 to 40 minutes.

Me and brown sugar - I typically buy light and dark brown sugar and mix the two in a canister. The original recipe called for all white sugar. I don't think the brown sugar changes the taste that much - I just wanted to try it.

Obviously, I added chocolate chips to these.
I love a tall cold glass of milk with banana bread.

Tuesday, January 3, 2012

Walk at Home ... Kicked My Ass

Due to the lack of popularity in my blog, I'm going to go ahead and write about a few changes I'm making in my life. If you know me very well then you know that my weight has been an issue most of my life and that my excess weight is the result of bad eating habits and lack of exercise.

Over the last few months a few things have happened that have made me want to focus on changing my bad eating habits and lack of exercise. Perhaps those things will be covered in a future post. Since I've have a 25 plus year history with weight issues, I know what works for me and what doesn't. 

My latest exercise adventure.
Exercise is something I don't mind, it's just something I haven't made a priority. Food is something I love and controlling it is something that I need to make a priority.

I'm a huge fan of QVC. You can't be a QVC fan and not know about Leslie Sansone's Walk at Home program. I decided why not give it a shot. I bought one of her DVDs at my local Walmart. 

Last night, I walked 30 minutes on the treadmill - we have a Gold's Gym Trainer 410 from Walmart - and then decided to give Mile 1 a try. You should know that I walked at 0 incline and averaged 2 to 2.3 mile per hour in speed.

That's right, no warm up ... take me straight to Mile 1. The description for Mile 1 is A fresh Walk at Home - 15 minute mile! It's a 4 mile per hour pace and a new cast of walkers makes it fun and inspirational. I didn't make it five minutes! 

I really don't know what I was expecting, but I do know I wasn't expecting it to kick my ass. I ended up watching the rest of Mile 1 in addition to Mile 2 and Mile 3. 

Today, I decided it was best to start with the warm up. I found myself swearing at the television and calling Leslie names. And, I called myself a few while I was at it. Needless, to say I'm so out of shape the warm up wore me out. 

The leg lifts about killed me. My dear husband pointed out that the ladies in the video have skinny legs. Don't get me wrong, he was nice about it and helped put thing in perspective.

I do think the program is a good one for anyone that wants to give exercise a try without going to the gym or buying equipment. You need enough space to take two steps forward and two steps back and to the side. The thing to remember is that you didn't get out of shape over night, so give yourself a chance to get back in the groove.

Tomorrow is a new day, and I'm determined to get back to my old self that enjoyed exercising ... so, I'll be giving Leslie another shot. My thought is that by next week, I will work my way up to Mile 1.

Stay tuned ...


Monday, January 2, 2012

Love of Post-it Notes

The ribbon might be a little long, but it
gives it a bit of sass.
Most of my close friends and former co-workers know that I love Post-it notes. I got super excited, when I saw the Post-It Present pinned on Pinterest. The pin came from the blog Paper Wings.

It didn't take long for me to head to Hobby Lobby for scrapbook paper. Walmart is a weekly trip for me, so I bought a few of the 5 x 7 acrylic frames for less than $1 each. I already have a decent inventory of fabric ribbon. I also bought a few packs diamond embellishments at Hobby Lobby.

Quick note about Hobby Lobby: unless you are on a time crunch, you should never pay full price at Hobby Lobby. Their weekly sale rotates every four two six weeks, so with a little planning you can get all your crafting supplies on sale. The sale runs Monday (close on Sunday) to Saturday, and the latest sale flyer is available online.

This Post-it stand has to be one of the easiest and quickest things you can make. I think it would be a great gift for just about anyone. The picture is of the first one I made - I made it in less than five minutes. I'm going to give it to the receptionist at my husband's office - I think she'll be a good user to see how it holds up. It seems like it would be functional, but I'll let her put it to the test before making more.

The Stella & Dot version.
I think the turquoise Post-its would look great,
I used what was available in my office.
Here's how simple the Post-it stand is to make:

  • Cut a piece of scrapbook paper to the size of the acrylic frame. I used a 5 x 7 frame because I like the proportions with the pad of Post-its.
  • Add a band of paper (if you like that look) about 1/4 of the way down the main piece of paper.
  • Use ribbon and embellishments as desired.
  • Peel / remove the protect cover from the frame. Stick the pad of Post-its to the frame. I did not use glue.

Here's how to make it using Stella & Dot jewelry boxes.

  • Cut the back of a large jewelry box down to 5 x 7. 
  • The medium size jewelry box works well for cutting the bands.
  • Use ribbon and embellishment if desired.
  • Peel / remove the protective wrap from the frame then stick the Post-it to the frame.